Many things can cause an instrument to buzz.
Listed below are a few of the more common causes, along with suggestions for stopping the buzzing in an emergency if professional help is not immediately available:
Accessories
Fine tuner vibrating: Undo the tuner screw, insert two pieces of thread into the resulting hole, screw the tuner back in and trim any excess thread. The thread will fill the gap and stop the buzz. If your instrument's tailpiece has separately installed fine tuners, you may want to replace the tailpiece with one that has built-in tuners, which are less likely to buzz.
Loose decorative pin in tuning peg: Remove the tuning peg and the decorative pin. Using a toothpick, insert a very small amount of white glue into the hole. Reinsert the decorative pin and hold for 20 seconds. Remove any excess glue using a damp tissue.
Loose chinrest mountings: Tighten slightly with a chinrest key. Do not over-tighten.
Loose sliding mute: Slide the mute down over the silk windings of the strings or bend the metal wire a bit.
Loose wolf eliminator: Tighten the screw slightly.
Endpin: There could be a loose screw, shaft or tip. On Stahlhammer endpins, a rubber ring may be missing at the top of the thinner shaft. On certain other types of endpins, there may be a missing cork at the inner end of socket or a plastic sleeve at the outer end of the socket. Some endpins have exchangeable tips that may also loosen, causing a buzz.
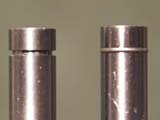
In Stahlhammer endpins, a missing rubber ring on the inner shaft can cause a buzz
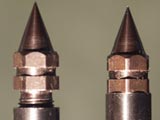
Left - the loose endpin tip can cause a buzz
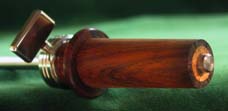
Cork
Jewelry or buttons in contact with instrument: Separate with a soft cloth.
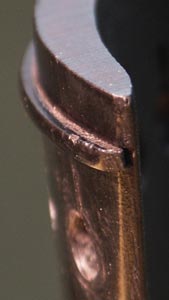
Loose tailpiece bar
Loose tailpiece bar: Insert a small amount of white glue between the bar and tailpiece using a toothpick. Hold for 20 seconds, then remove excess glue with a damp tissue.
Contact between tailpiece and chinrest: Adjust the chinrest position by moving it a little to the right or left.
Contact between tailpiece and saddle: Insert a small piece of cardboard in the narrow area between the saddle and the tailpiece.
Contact between tailpiece and top: Insert a small piece of cardboard in the narrow area between the top and the tailpiece. Bring to a violinmaker for long-term correction (such as lengthening the tailgut).
Strings
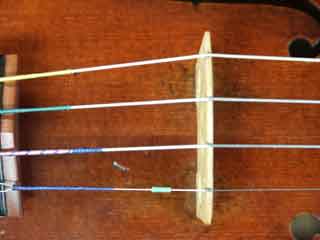
The loose E string tubing is a frequent cause of a buzz
Small plastic tubing loose: This tubing, intended to protect the string at the bridge, can buzz when it hangs loosely around the string between the bridge and the tailpiece. Remove the tubing, slide it down over the thicker silk winding on the string until it is snug, or reposition it under the string on the bridge. Be aware, however, that the latter action will raise the string and reduce the playing margin for the neighboring string.
Faulty string with loose winding: A loose winding on a string will cause a buzz to occur only on this string. Replace the string.
Loose string end in peg box: Unwind the string and shorten the length of the projecting end of the string.
Bridge & Nut
Loose bridge parchment: This thin parchment is found beneath some strings where they cross the bridge. If the parchment comes loose from the bridge, loosen the appropriate string, pull it aside, and insert a very small amount of white glue between the bridge and the parchment using a toothpick. Press the parchment to the bridge for 20 seconds. Remove any excess glue using a damp tissue. Allow the glue to dry before repositioning and tuning the string.
String notches at topnut too wide or too low: This causes buzzes only on open strings. Loosen the string and place a small piece of thin leather or paper between the string and the topnut. Re-tighten the string.
Instrument
Open seam: An seam that has opened in the instrument's body can cause a buzz. Insert a small piece of thin paperboard or paper into the opening, but do not use force, which may cause the seam to open farther.
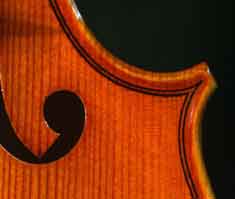
Dust accumulated between the narrow points of the f-holes: Slide a thin piece of paper across the narrow point of the f-hole to clear any accumulated of dust.
Loose fingerboard: Bring the instrument to a violinmaker to re-glue.
Fingerboard bumpy or too low: Sight down the length of the fingerboard toward a light source to detect bumps or other irregularities in the fingerboard. Bring the instrument to a violinmaker to have the fingerboard redressed.
Low strings over fingerboard: The section of the fingerboard that projects over the instrument's body can rise in low humidity conditions, causing the strings to vibrate against the fingerboard. A violinmaker can cut and install a higher bridge. If you know how to use a bridge jack, as a quick fix in an emergency situation you can insert thin pieces of wood (veneer works well) under the bridge feet. But make sure that the grain of the wood inserts runs in the same direction as the grain in the instrument's top so that it will bend along the cross curve of the top.
Partially open crack in the wood of the top, back, or sides: After thoroughly washing hands, rub a couple drops of water into the crack to swell the wood. Remove excess water with tissue.? Bring to violinmaker as soon as possible.
Purfling: the inlay along the edge of the instrument
Loose purfling (the inlay along the edge of the instrument): After thoroughly washing hands, put a few drops of water on the area and tap a little with your finger. Rub in the water to swell the wood. Remove excess water with a tissue.